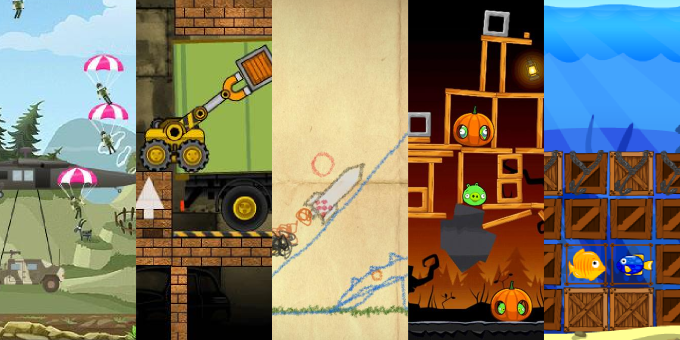
More and more games are using dynamic physics to add to the gameplay or as a core element of the gameplay. Box2D is a popular and powerful physics library that is considered to be one of the best 2D physics libraries around. It is used by high profile games like Angry Birds and Crayon Physics Deluxe. This tutorial will focus on the Flash version of Box2D and assumes that you have basic experience with Flash and ActionScript 3. If you are new to Flash, check out Nandrew’s excellent Flash tutorial.
Getting Started
Box2D has been ported to a number of languages, and to make things confusing, there are a number of different Flash ports available on the Web. In this tutorial we’ll be using version 2.1a of Box2DFlash which is considered the most official Flash port of Box2D. Download Box2DFlash 2.1a for Flash 10 from the Box2DFlash website.
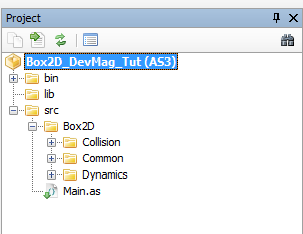
Extract the download, and copy the Box2D folder into the src folder of your project, like this:

Box2D Overview
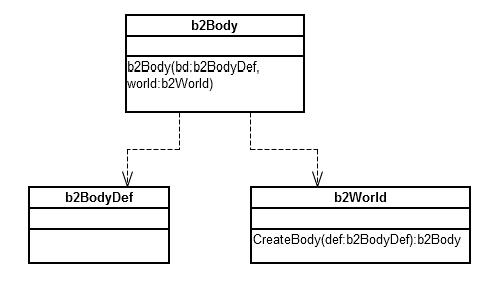
There is a fair bit of terminology in Box2D that you need to know to understand how things work. The following diagram shows a top-down view of Box2D.

At the core we have a world that holds our entities and manages the dynamic physics simulations. These entities in our world are known as bodies, and a world can have 0 or more bodies. Each body consists of 0 or more shapes. A shape, such as a rectangle or a circle, is used for collision detection. Each one of these shapes is connected to the body through a fixture definition and adds properties such as density and friction.

Every body has a body definition to define properties such as position, type (dymanic, static or kinetic) and more. To create a body, you need the body definition and a reference to the world. The world has a convenient helper function to create bodies.
Hello Physics World
In this tutorial we are going to create this:
We will generate random shapes and let them free-fall. Some walls, a floor, and a few blocks will make up the environment. Let’s jump into the code.
package
{
  import flash.display.Sprite;
  import flash.events.Event;
  import Box2D.Common.Math.*;
  import flash.events.TimerEvent;
  import flash.utils.Timer;
  import Box2D.Dynamics.*;
  import Box2D.Collision.Shapes.*;

  public class Main extends Sprite
  {
    private var world:b2World;
    private var timestep:Number;
    private var iterations:uint;
    private var pixelsPerMeter:Number = 30;
    private var genBodyTimer:Timer;
    private var sideWallWidth:int = 20;
    private var bottomWallHeight:int = 25;

    public function Main():void
    {
      this.initWorld();
      this.createWalls();
      this.createStaticBodies();
      this.setupDebugDraw();

      this.genBodyTimer = new Timer(500);
      this.genBodyTimer.addEventListener(TimerEvent.TIMER, this.genRandomBody);

      if (stage) init();
      else addEventListener(Event.ADDED_TO_STAGE, init);
    }

  //...function definitions will go here

  }
}
To make things simple we’ll keep all our work in the Main class.
Our program will flow as follows: We initialize our Box2D world, we create some walls and a few static blocks with which our objects can interact, then we set up the debug drawing mode, and we add a timer for generating random bodies. Finally we initialize our game loop after the Box2D world has been added to the stage.
private function initWorld():void
{
  var gravity:b2Vec2 = new b2Vec2(0.0, 9.8);
  var doSleep:Boolean = true;

  // Construct world
  this.world = new b2World(gravity, doSleep);
  this.world.SetWarmStarting(true);
  this.timestep = 1.0 / 30.0;
  this.velocityIterations = 6;
  this.positionIterations = 4;
}
The world is the core of our Box2D environment. It holds all of our bodies and manages the physics simulations. We set the gravity, and we state that the world can stop calculating physics for bodies that have come to rest. A ‘warm starting’ tells the world that bodies must start off active. If this was false, the bodies would have stayed put until they were woken up or until something collided with them. The timestep variable specifies how often the world should calculate the physics (in this case, every 1/30 seconds, or 30 Hz – thirty times a second). The iterations determine how many times per time step to calculate the position and the velocity of a body before moving on to the next one in the queue, the trade-off being performance versus accuracy.
private function createWalls():void
{
  var wallShape:b2PolygonShape = new b2PolygonShape();
  var wallBd:b2BodyDef = new b2BodyDef();
  var wallB:b2Body;

  wallShape.SetAsBox(
    sideWallWidth / pixelsPerMeter / 2,
    this.stage.stageHeight / pixelsPerMeter / 2);

  //Left wall
  wallBd.position.Set(
    (sideWallWidth / 2) / pixelsPerMeter,
    this.stage.stageHeight / 2 / pixelsPerMeter);
  wallB = world.CreateBody(wallBd);
  wallB.CreateFixture2(wallShape);

  //Right wall
  wallBd.position.Set(
    (this.stage.stageWidth - (sideWallWidth / 2)) / pixelsPerMeter,
    this.stage.stageHeight / 2 / pixelsPerMeter);
  wallB = world.CreateBody(wallBd);
  wallB.CreateFixture2(wallShape);

  //Bottom wall
  wallShape.SetAsBox(
    this.stage.stageWidth / pixelsPerMeter / 2,
    bottomWallHeight / pixelsPerMeter / 2);
  wallBd.position.Set(
    this.stage.stageWidth / 2 / pixelsPerMeter,
    (this.stage.stageHeight - (bottomWallHeight / 2)) / pixelsPerMeter);
  wallB = world.CreateBody(wallBd);
  wallB.CreateFixture2(wallShape);
}
Now we create walls, so that our objects stay within the desired area. If you remember the diagrams above, we need to follow a number of steps to create a body.
The values and calculations in the code sample may look a bit verbose, but I designed it that way to show you how things work.
To use distance units in Box2D, you need to understand these key points:
Measurements are in metres. However, beware: a 1 pixel : 1 metre ratio will be very computationally intensive, and there will be no way to represent the distance from one pixel to the next on screen, since pixels are directly next to each other. It’s best to use the following equations:
box2DMeters = pixels / pixelsPerMeter
pixels = box2DMeters * pixelsPerMeter
The origins of Box2D bodies are in their centres. This means that the distance between one body and another is actually the distance between their centres. This also means that we need to pass half of the width and half of the height as the dimensions of the shape, because the shape is created from its centre outwards.
Now that that’s cleared up, let’s break down the creation of the left wall.
wallShape.SetAsBox(
  sideWallWidth / pixelsPerMeter / 2,
  this.stage.stageHeight / pixelsPerMeter / 2);
To set the dimensions of the wall shape, we divide the desired width of the wall by pixelsPerMeter to convert it into metres, and then we divide that by 2 to get half of the width. We use the same idea for the height.
wallBd.position.Set(
  (sideWallWidth / 2) / pixelsPerMeter,
  this.stage.stageHeight / 2 / pixelsPerMeter);
The next step is to set the position of the body. The wall is on the left, so the base x co-ordinate will be 0. We then add half the width of the wall – remember that the origin is in the centre – and then we convert the coordinate into metres. We want the y co-ordinate of the wall to be in the centre of the world, so we halve the height of the stage and then convert to metres.
wallB = world.CreateBody(wallBd);
wallB.CreateFixture2(wallShape);
The body is created and added to the world. We then attach the shape to the body using a fixture.
private function createStaticBodies():void
{
  var blockBody:b2Body;
  var blockBd:b2BodyDef = new b2BodyDef();
  var blockShape:b2PolygonShape = new b2PolygonShape();
  var rectHeight:int = 30;

  //Create a stack of static rectangular bodies for our randomly
  //generated bodies to interact with.

  blockBd.position.Set(
    this.stage.stageWidth / 2 / pixelsPerMeter,
    (this.stage.stageHeight - this.bottomWallHeight - (rectHeight / 2))
          / pixelsPerMeter);
  blockShape.SetAsBox(320 / pixelsPerMeter / 2, rectHeight / pixelsPerMeter / 2);
  blockBody = world.CreateBody(blockBd);
  blockBody.CreateFixture2(blockShape);

  blockBd.position.Set(
    this.stage.stageWidth / 2 / pixelsPerMeter,
    (this.stage.stageHeight - (this.bottomWallHeight + rectHeight)
          - (rectHeight / 2)) / pixelsPerMeter);
  blockShape.SetAsBox(240 / pixelsPerMeter / 2, rectHeight / pixelsPerMeter / 2);
  blockBody = world.CreateBody(blockBd);
  blockBody.CreateFixture2(blockShape);

  blockBd.position.Set(
    this.stage.stageWidth / 2 / pixelsPerMeter,
    (this.stage.stageHeight - (this.bottomWallHeight + 2 * rectHeight)
          - (rectHeight / 2)) / pixelsPerMeter);
  blockShape.SetAsBox(140 / pixelsPerMeter / 2, rectHeight / pixelsPerMeter / 2);
  blockBody = world.CreateBody(blockBd);
  blockBody.CreateFixture2(blockShape);
}
The function above creates a few static rectangles that the randomly generated bodies can bounce off of. Again, the equations are verbose to help you remember that that a shape’s origin is in the centre. We use half the width and half the height, and we need to pass the values through in metres.
private function setupDebugDraw():void
{
  var debugDraw:b2DebugDraw = new b2DebugDraw();
  var debugSprite:Sprite = new Sprite();

  addChild(debugSprite);
  debugDraw.SetSprite(debugSprite);
  debugDraw.SetDrawScale(30.0);
  debugDraw.SetFillAlpha(0.3);
  debugDraw.SetLineThickness(1.0);
  debugDraw.SetFlags(b2DebugDraw.e_shapeBit | b2DebugDraw.e_jointBit);
  world.SetDebugDraw(debugDraw);
}
This tells our Box2D world to draw debug information on the bodies. This allows us to see the joints and shapes of the bodies. It also shows us when a body goes to sleep by changing its colour; the colour changes back again when it wakes up.
private function init(e:Event = null):void
{
  this.removeEventListener(Event.ADDED_TO_STAGE, init);
  this.addEventListener(Event.ENTER_FRAME, update);
  this.genBodyTimer.start();
}
Our setup is almost complete! We start the game loop and start a timer to generate random bodies.
private function genCircle():void
{
  var body:b2Body;
  var fd:b2FixtureDef;
  var bodyDefC:b2BodyDef = new b2BodyDef();
  bodyDefC.type = b2Body.b2_dynamicBody;

  var circShape:b2CircleShape
     = new b2CircleShape((Math.random() * 7 + 10) / pixelsPerMeter);

  fd = new b2FixtureDef();
  fd.shape = circShape;
  fd.density = 1.0;
  fd.friction = 0.3;
  fd.restitution = 0.1;
  bodyDefC.position.Set(
    (Math.random() * (this.stage.stageWidth - sideWallWidth - 20)
         + sideWallWidth + 20) / pixelsPerMeter,
    (Math.random() * 80 + 40) / pixelsPerMeter);
  bodyDefC.angle = Math.random() * Math.PI;
  body = world.CreateBody(bodyDefC);
  body.CreateFixture(fd);
}

private function genRectangle():void
{
  var body:b2Body;
  var fd:b2FixtureDef = new b2FixtureDef();
  var rectDef:b2BodyDef = new b2BodyDef();

  rectDef.type = b2Body.b2_dynamicBody;

  var polyShape:b2PolygonShape = new b2PolygonShape();

  fd.shape = polyShape;
  fd.density = 1.0;
  fd.friction = 0.3;
  fd.restitution = 0.1;
  polyShape.SetAsBox(
    (Math.random() * 16 + 20) / pixelsPerMeter / 2,
    (Math.random() * 16 + 20) / pixelsPerMeter / 2);

  rectDef.position.Set(
    (Math.random() * (this.stage.stageWidth - 2 * (sideWallWidth + 20))
         + (sideWallWidth + 20)) / pixelsPerMeter,
    (Math.random() * 80 + 40) / pixelsPerMeter);

  rectDef.angle = Math.random() * Math.PI;
  body = world.CreateBody(rectDef);
  body.CreateFixture(fd);
}
These functions create randomly sized and positioned circles and rectangles. All the bodies we created before (the walls, the floor, and the blocks) were static. This means that they have zero mass and zero velocity, and that we can move them only manually. For the rectangles and circles, we want dynamic behaviour. We want these bodies to bounce around and be all physics-like, so, we set the body type to dynamic, which means that it has a positive mass and that it has a non-zero velocity that is determined by forces in the world, such as gravity.
private function genRandomBody(e:TimerEvent):void
{
  var bodyType:Number = Math.random();
  (bodyType < 0.5) ? this.genCircle() : this.genRectangle();
}
We randomly generate a circle or a rectangle in the air (see the code above) that will free-fall.
private function update(e:Event = null):void
{
  world.Step(timestep, velocityIterations, positionIterations);
  world.ClearForces();
  world.DrawDebugData();
}
And finally, we have the game loop. We tell the world to take a step, with values for the simulation frequency and the number of times per time step to calculate the velocity and the position of each body. Box2D requires us to clear the forces after every step so that things are cleaned up for the next step of the simulation. Then we draw the shapes and other debug information.
That’s it! We now have a world filled with bodies that exhibit dynamic, real-time physics. Now that we have all the basic pieces together, there are a number of things to try next. How about setting up a stack of dynamic blocks you can shoot balls at? Or how about creating a number of shapes and attaching them to the same body? Have fun experimenting, and share your ideas and thoughts in the comments.
Download
The source code for this project: Box2D_DevMag_Tut.zip (370 KB).
Further reading
- There are some useful nuggets in the Box2DFlash FAQs, and a heap of useful information can be found in the API Documentation.
- Also read an interesting and in-depth tutorial on how to create a Peggle clone in Box2D.
- The World Construction Kit is a powerful toolset for creating Box2D games in the Flash IDE.
Don’t forget there are tools around to help build your levels too. One such tool that uses box2dflash as well is called BisonKick http://jacobschatz.com/bisonkick/
You can test, build and see the level in realtime in a browser and then save it out as an array or xml.
Great write up Ricky!
Pingback: Starling API – 20 – Lier Starling avec Box2D pour gérer les collisions « Adobe Flex Tutorial
Pingback: Box2DFlash Tutorial – wiki.kukool.cn
cool